> ## Documentation Index
> Fetch the complete documentation index at: https://docs.siliconflow.com/llms.txt
> Use this file to discover all available pages before exploring further.
# How to use OpenClaw with SiliconFlow APIs
OpenClaw is a personal AI assistant that you run on your own devices. It answers you on the channels you use every day — WhatsApp, Telegram, Slack, Discord, Signal, iMessage, Microsoft Teams, and more. Your conversations, memory, and data stay on your own machine, not on a third-party server. If you want a personal, single-user assistant that feels local, fast, and always-on, this is it.
OpenClaw now supports a wide range of AI model providers — all you need is your own API key to get started. In this guide, we'll walk you through how to connect SiliconFlow's APIs to OpenClaw, so you can power your personal assistant with 100+ SOTA AI models in just a few steps.
## **Step 1: Prerequisites**
### **1.1 Get Your SiliconFlow API Key**
Before you begin, ensure you have a valid SiliconFlow account:
* **Get Your SiliconFlow API Key**: [https://cloud.siliconflow.com/account/ak](https://cloud.siliconflow.com/account/ak)
You will need this key when configuring OpenClaw.
### **1.2 Node 22 or newer**
To verify your Node version:
```
node --version
```
If your version is lower than 22, please upgrade Node.js before proceeding.
## **Step 2: Install OpenCla**
OpenClaw Recommended Installation Method
### **2.1 macOS/Linux:**
```
curl -fsSL https://openclaw.ai/install.sh | bash
```
### **2.2 Windows (PowerShell):**
```
iwr -useb https://openclaw.ai/install.ps1 | iex
```
For alternative installation methods and system requirements, refer to the official [OpenClaw documentation](https://docs.openclaw.ai/install).
## **Step 3: Configure SiliconFlow APIs**
### **3.1 Initialize Configuration**
After installation, run the following CLI in your terminal:
```
openclaw setup
```
This creates the openclaw\.json configuration file.
### **3.2 Locate the Configuration File**
On Windows:
```
%USERPROFILE%\.openclaw\openclaw.json
```
On macOS/Linux:
```
~/.openclaw/openclaw.json
```
Open the file in your preferred editor.
### **3.3 Add SiliconFlow as a Model Provider**
Merge the following configuration into the `"models"` section of your `openclaw.json` file.
```
"models": {
"providers": {
"siliconflow": {
"baseUrl": "https://api.siliconflow.com/v1",
"apiKey": "YOUR_SILICONFLOW_API_KEY",
"api": "openai-completions",
"models": [
{
"id": "deepseek-ai/DeepSeek-V3",
"name": "DeepSeek-V3",
"reasoning": false,
"input": [
"text"
],
"cost": {
"input": 0,
"output": 0,
"cacheRead": 0,
"cacheWrite": 0
},
"contextWindow": 200000,
"maxTokens": 8192
}
]
},
```
If you already have custom model configurations, merge only the relevant provider block without overwriting existing entries.
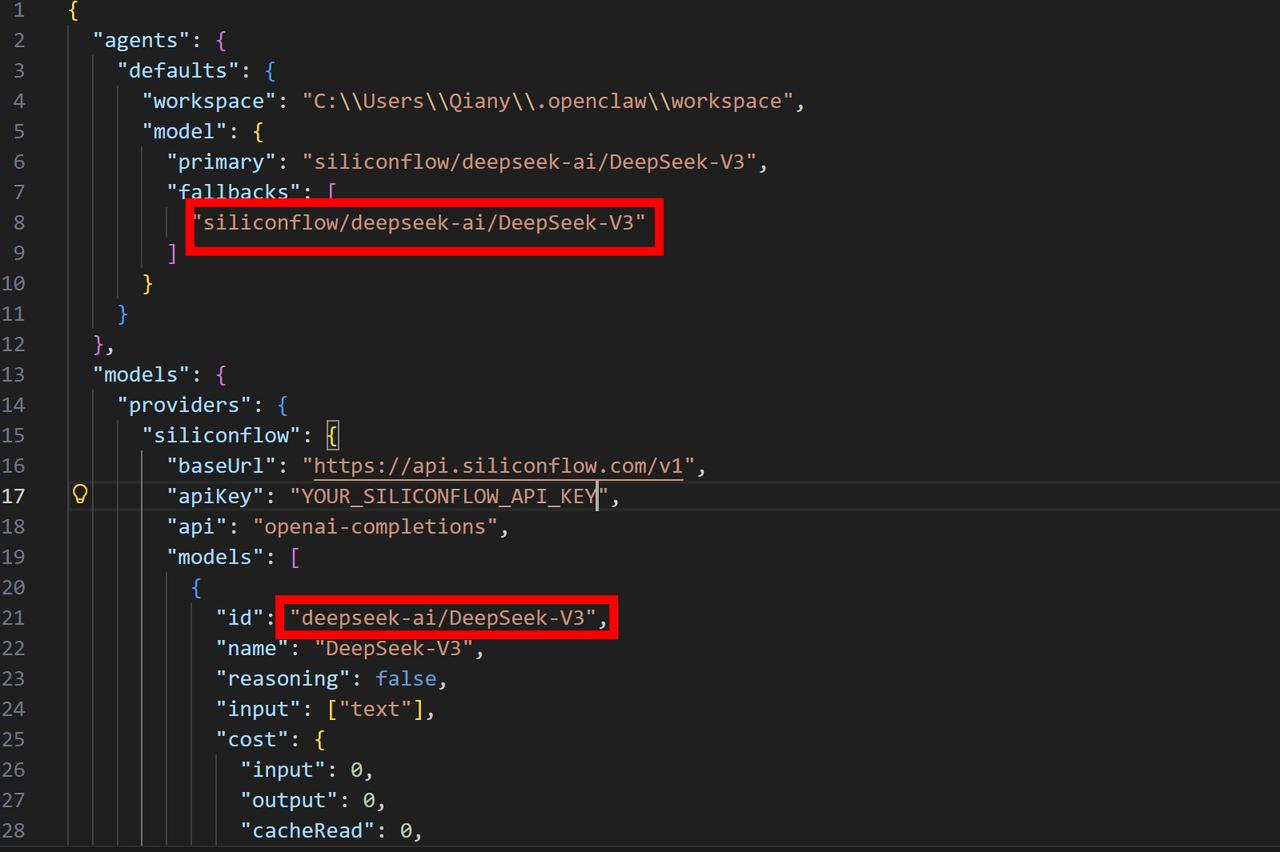
### **3.4 Register the Model in the Agents Section**
Add the following entry under the `"agents"` section:
```
"siliconflow/deepseek-ai/DeepSeek-V3"
```
Important:
* The model identifier must match the ID defined in the provider configuration.
* It is recommended to first add the model under the "fallbacks" section to prevent runtime errors caused by misconfiguration.
 ### **3.5 Verify Model Registration**
Run:
```
openclaw models list
```
If the model appears in the list, the configuration was successful.
### **3.5 Verify Model Registration**
Run:
```
openclaw models list
```
If the model appears in the list, the configuration was successful.
 By updating the `"models"`and `"agents"` sections, you can add more models supported by SiliconFlow
With SiliconFlow configured, you can now connect OpenClaw to a messaging platform. In the following section, we will use **Discord as an example** to demonstrate how to deploy an OpenClaw bot on Discord using SiliconFlow APIs.
*For detailed configuration guides on additional channels — including Telegram, WhatsApp, Slack, Signal, iMessage, Microsoft Teams, and more — please visit the official documentation at* [*https://docs.openclaw.ai/channels*](https://docs.openclaw.ai/channels)*.*
## **Example: Run OpenClaw in Discord**
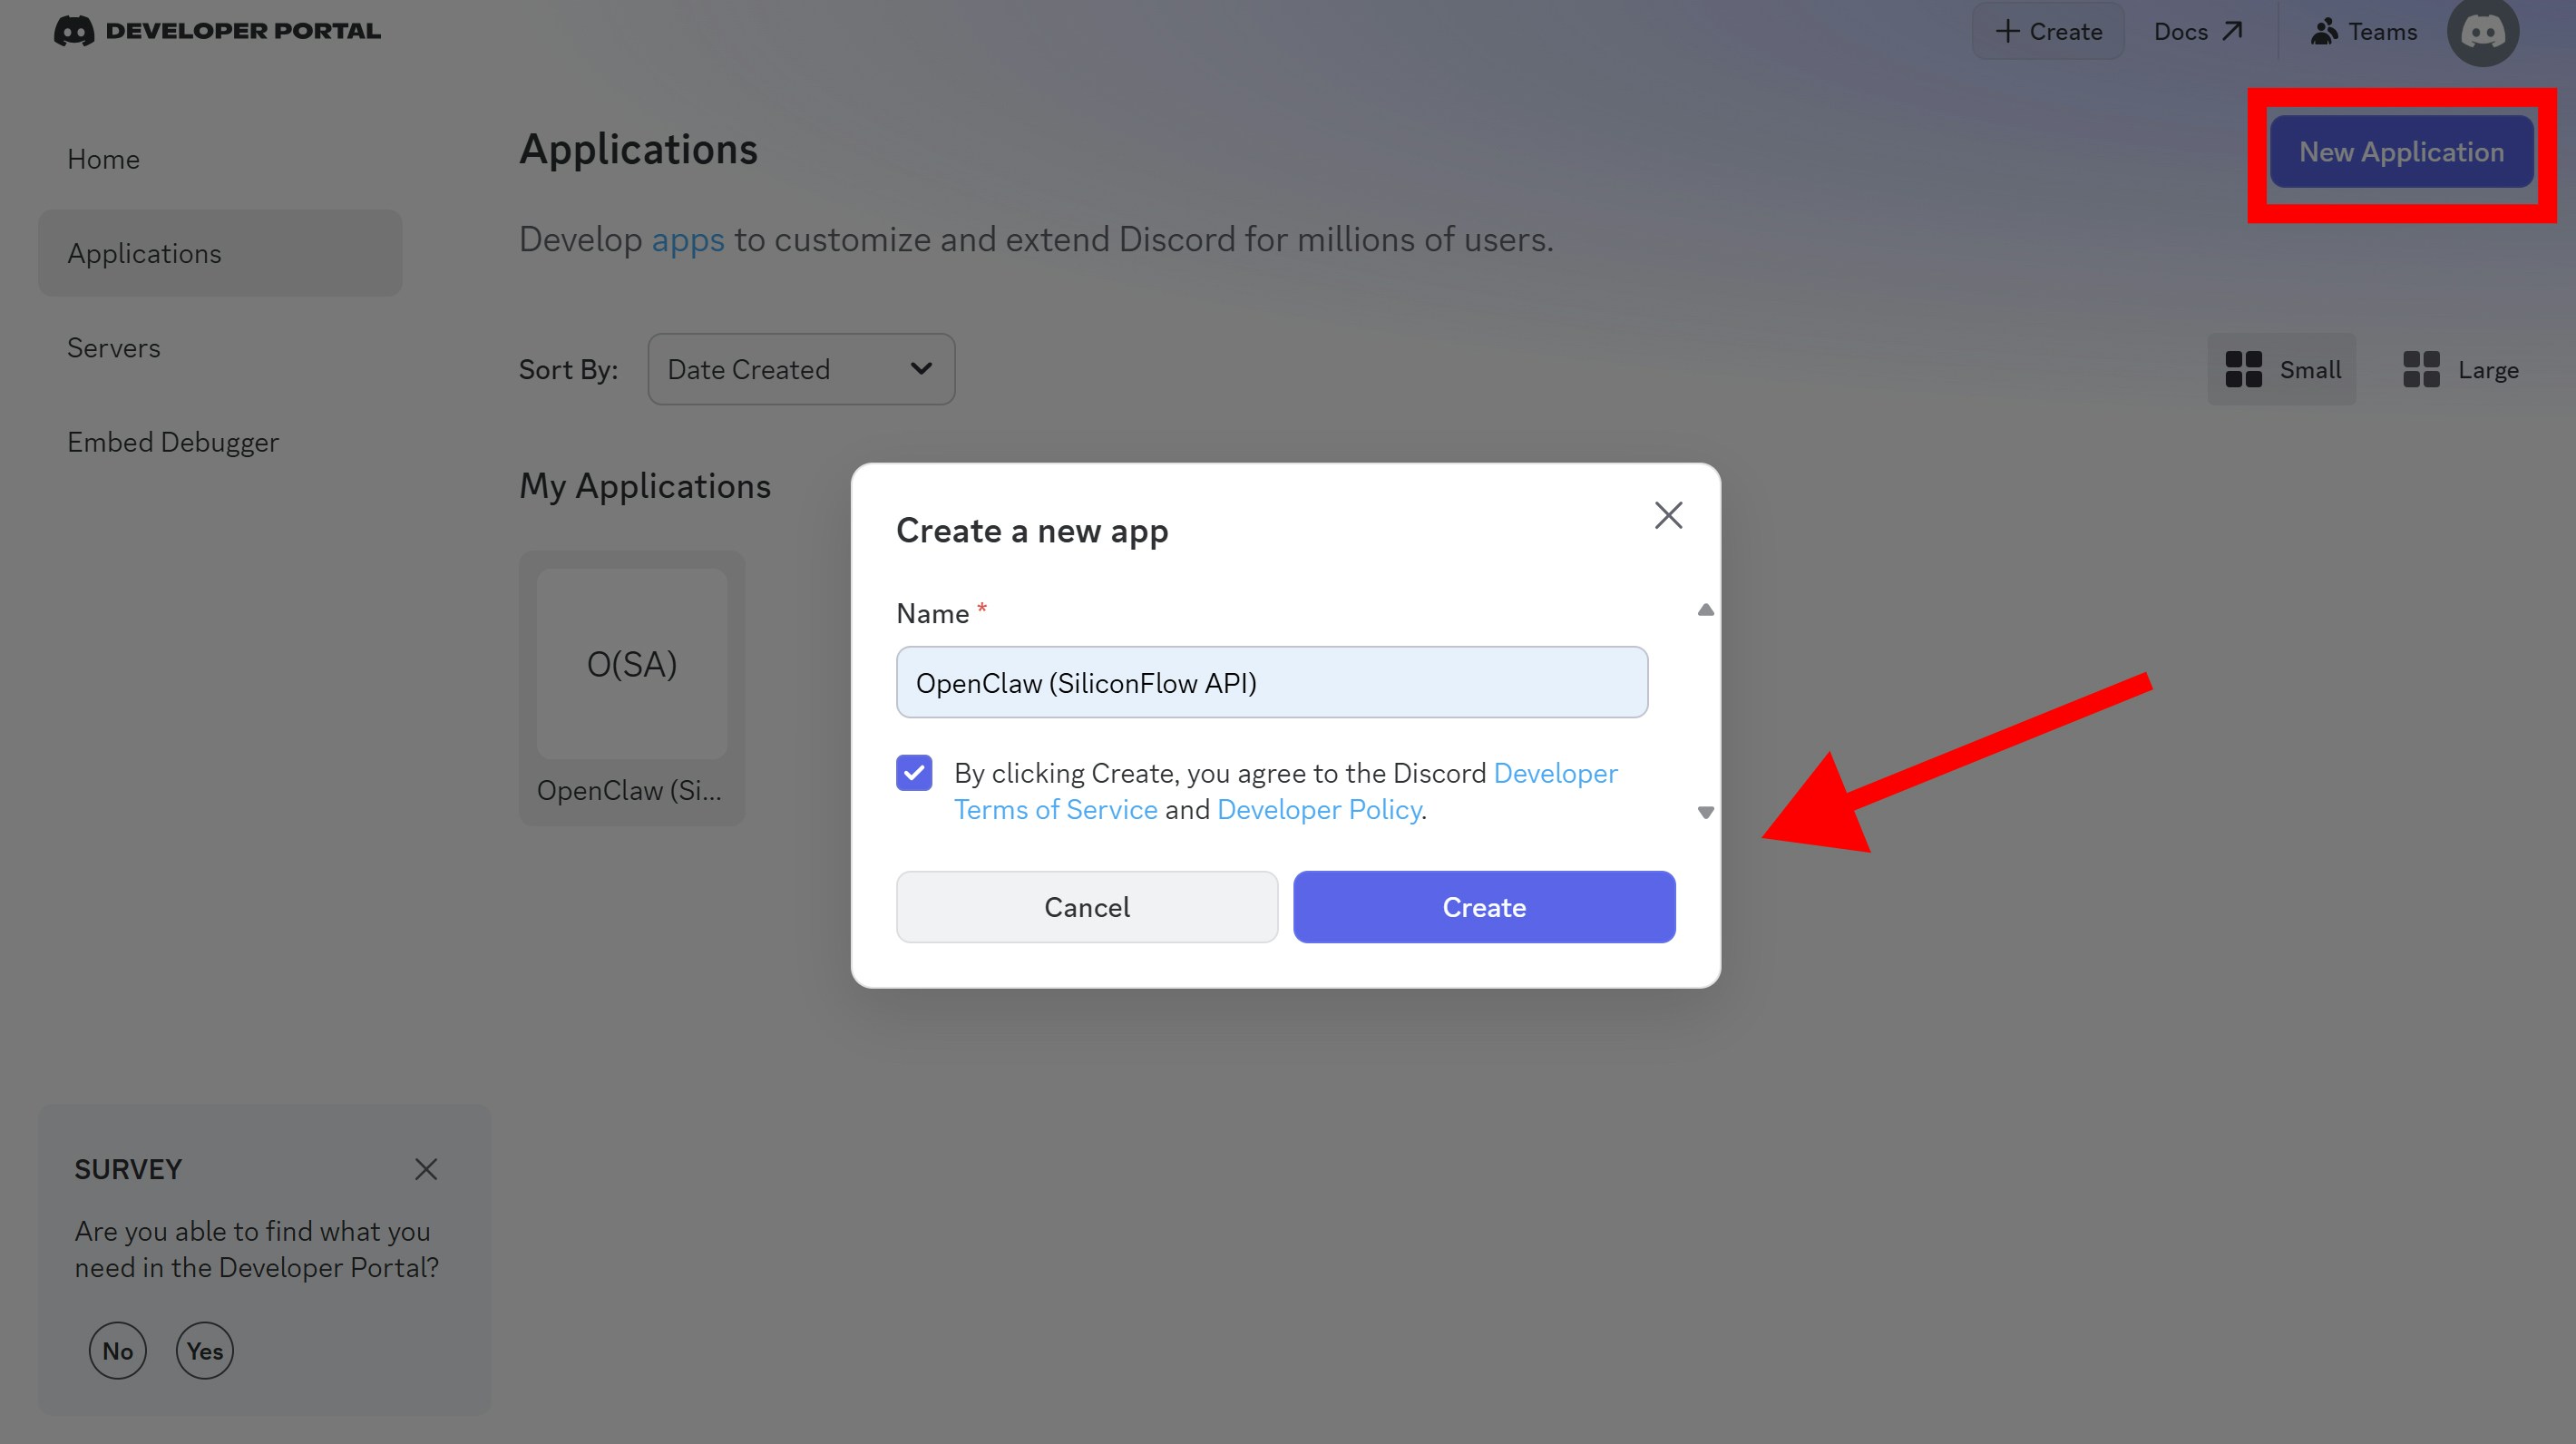
### **Create a Discord Application**
* Go to the [Discord Developer Portal](https://discord.com/developers/applications).
* Click `New Application`.
* Enter a bot name (e.g., `OpenClaw (SiliconFlow API)`) and then `Create`.
By updating the `"models"`and `"agents"` sections, you can add more models supported by SiliconFlow
With SiliconFlow configured, you can now connect OpenClaw to a messaging platform. In the following section, we will use **Discord as an example** to demonstrate how to deploy an OpenClaw bot on Discord using SiliconFlow APIs.
*For detailed configuration guides on additional channels — including Telegram, WhatsApp, Slack, Signal, iMessage, Microsoft Teams, and more — please visit the official documentation at* [*https://docs.openclaw.ai/channels*](https://docs.openclaw.ai/channels)*.*
## **Example: Run OpenClaw in Discord**
### **Create a Discord Application**
* Go to the [Discord Developer Portal](https://discord.com/developers/applications).
* Click `New Application`.
* Enter a bot name (e.g., `OpenClaw (SiliconFlow API)`) and then `Create`.
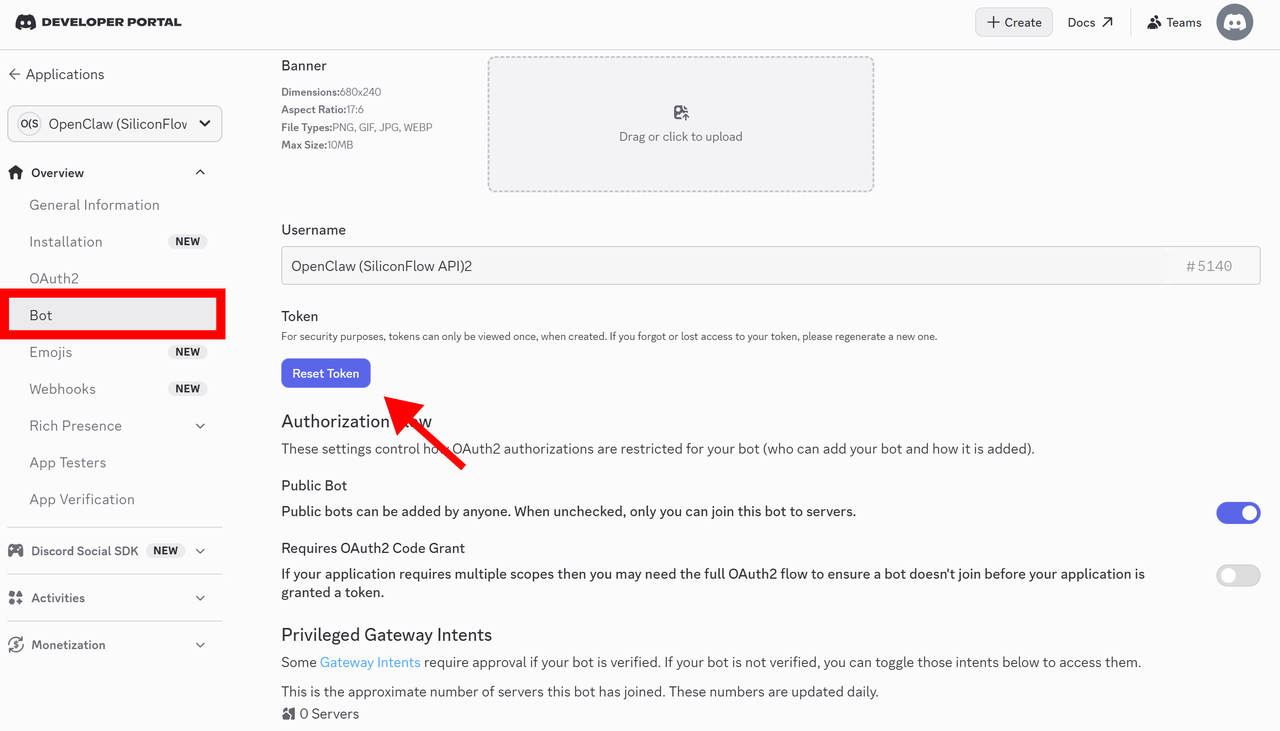
 ### **Configure the Bot**
Navigate to the `Bot `section.
#### **Reset and Copy Bot Token**
* Click `Reset Token`.
* Copy the token and store it securely. You will need it during the OpenClaw onboarding process.
### **Configure the Bot**
Navigate to the `Bot `section.
#### **Reset and Copy Bot Token**
* Click `Reset Token`.
* Copy the token and store it securely. You will need it during the OpenClaw onboarding process.
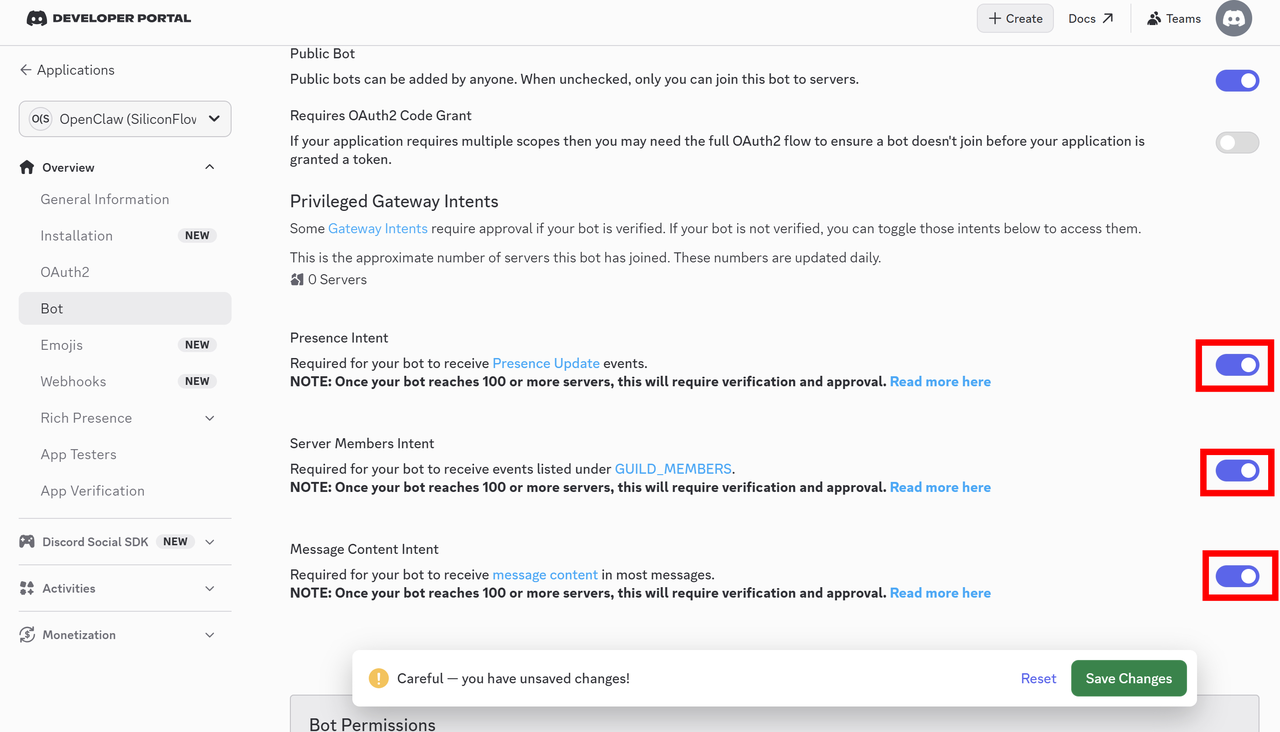
 #### **Enable Required Intents**
Enable the following features:
* Presence Intent
* Server Members Intent
* Message Content Intent
Click `Save Changes`.
#### **Enable Required Intents**
Enable the following features:
* Presence Intent
* Server Members Intent
* Message Content Intent
Click `Save Changes`.
 ### **Configure OAuth2**
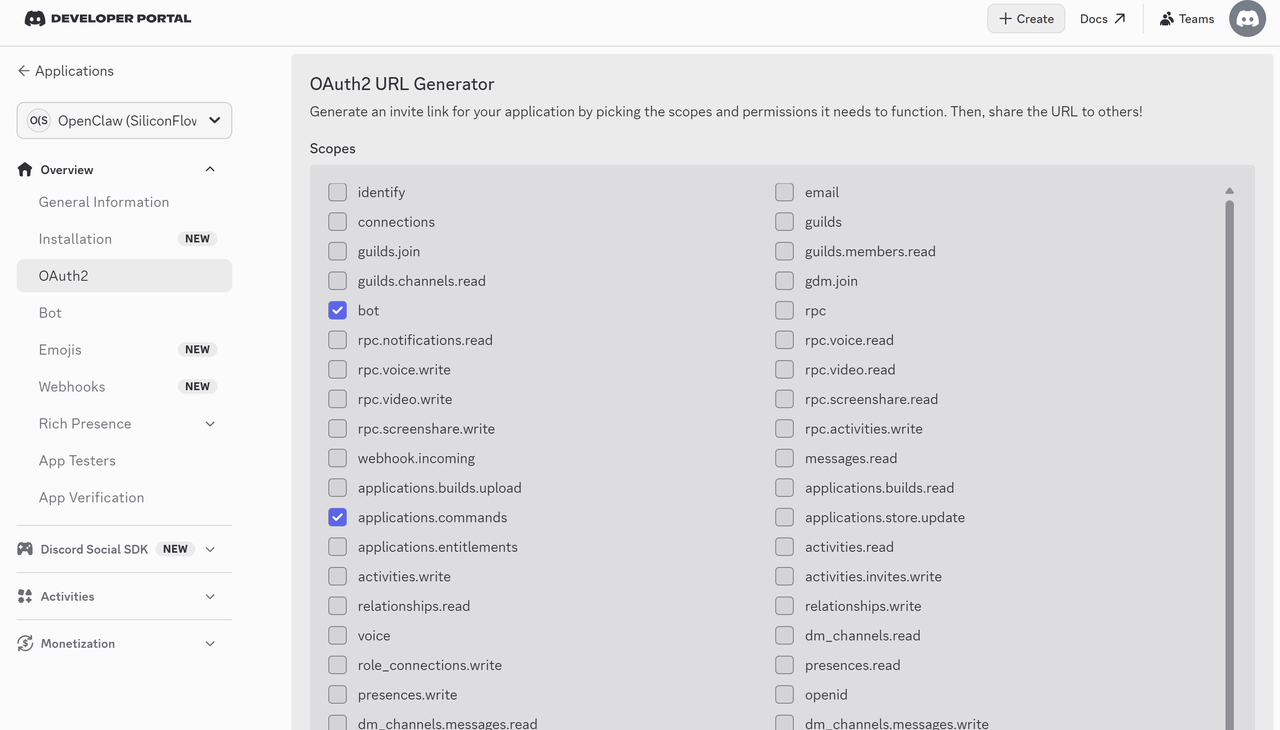
Go to **OAuth2 → URL Generator**.
#### **Scopes**
Enable the `bot` and `applications.commands` scopes for basic functionality.
### **Configure OAuth2**
Go to **OAuth2 → URL Generator**.
#### **Scopes**
Enable the `bot` and `applications.commands` scopes for basic functionality.
 #### **Bot Permissions**
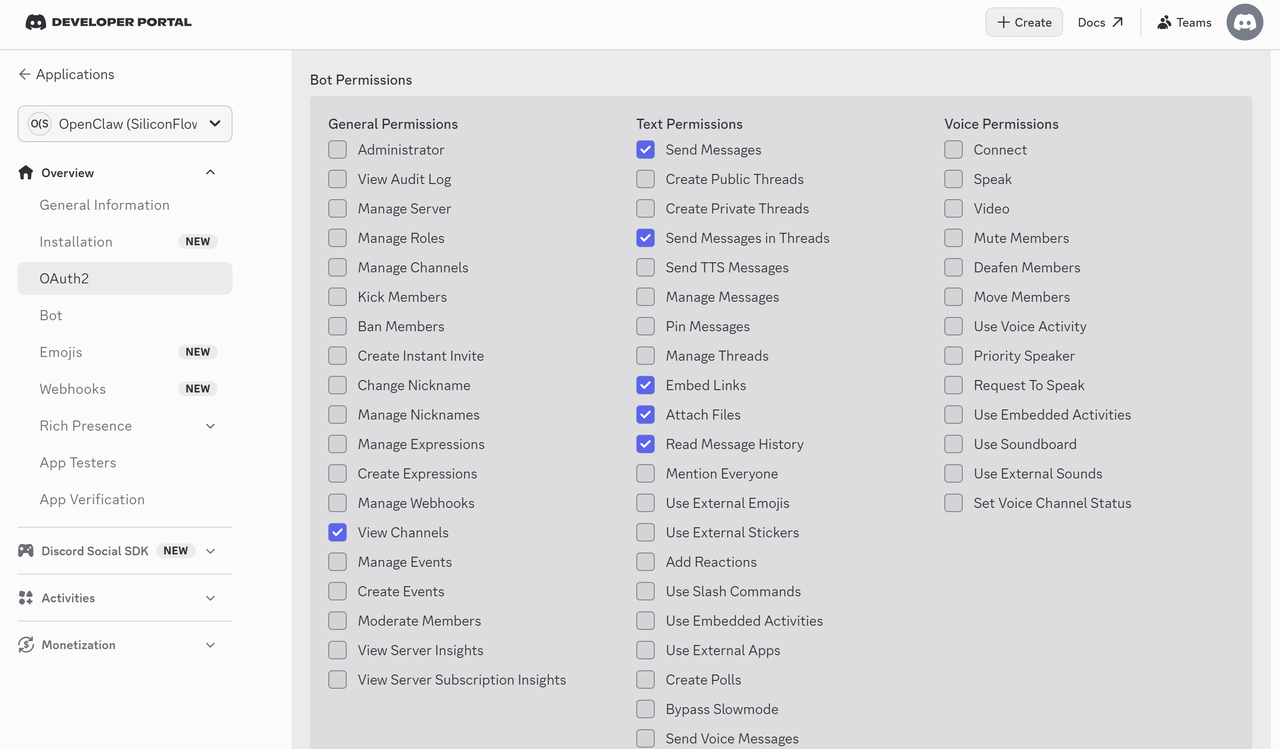
* Select the necessary permissions required for your use case.
* Copy the generated URL at the bottom of the page.
* Open the URL in your browser and:
* Select the target Discord server
* Confirm authorization
* Add the bot to your server
#### **Bot Permissions**
* Select the necessary permissions required for your use case.
* Copy the generated URL at the bottom of the page.
* Open the URL in your browser and:
* Select the target Discord server
* Confirm authorization
* Add the bot to your server
 ### **Onboard OpenClaw**
* In your terminal, run:
```
openclaw onboard
```
* During the openclaw onboard process:
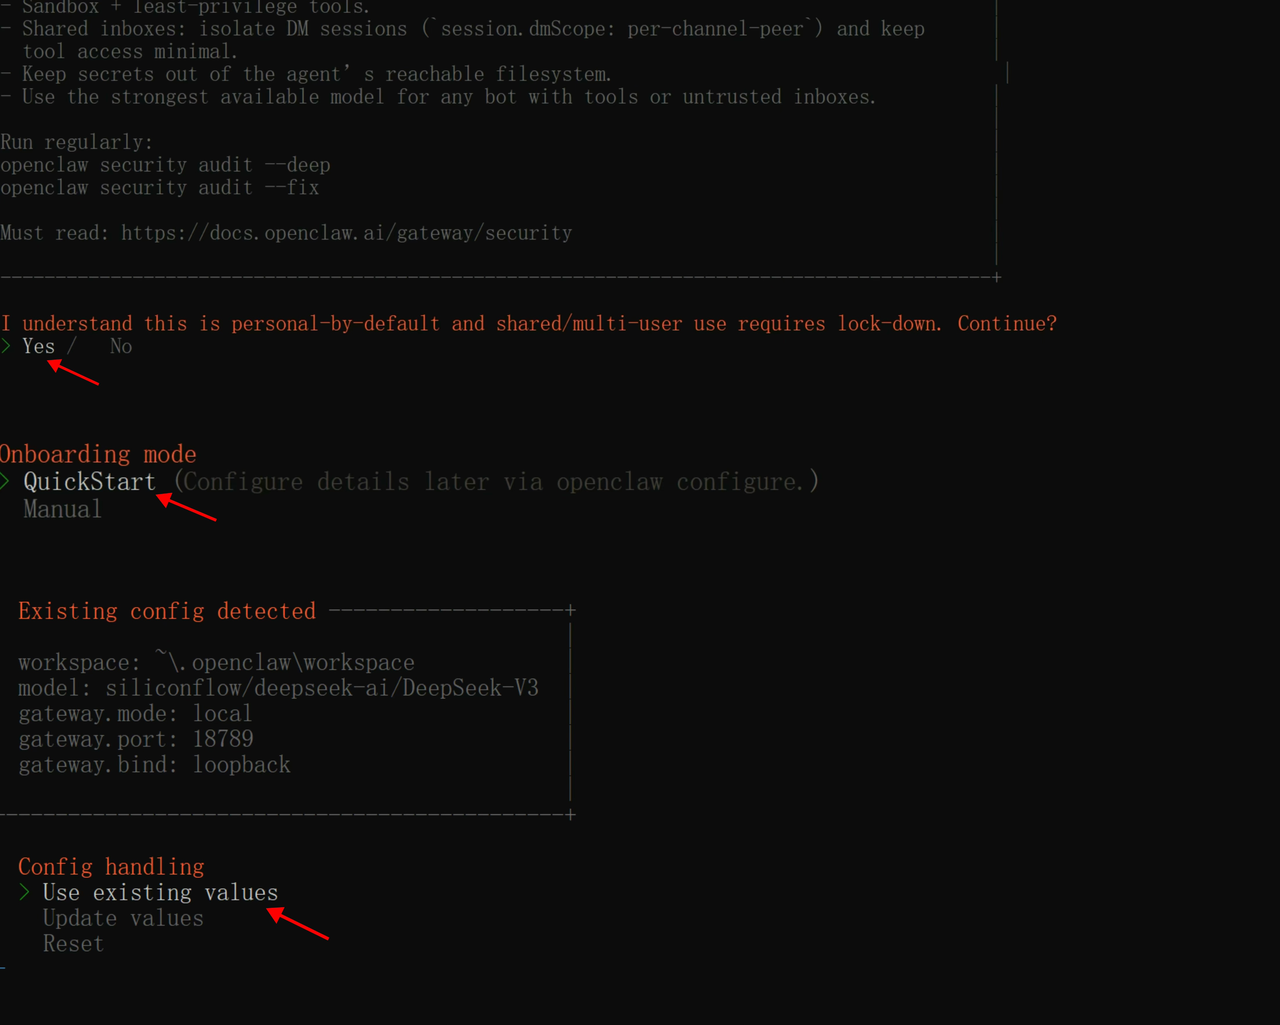
* Confirm that you understand OpenClaw operates as a personal-by-default assistant, then select `Yes` to proceed.
* Choose `QuickStart` as the onboarding mode.
* Select `Use existing values` to retain the previously configured workspace, model, and gateway settings. This ensures that your previously configured SiliconFlow model remains active without requiring reconfiguration.
### **Onboard OpenClaw**
* In your terminal, run:
```
openclaw onboard
```
* During the openclaw onboard process:
* Confirm that you understand OpenClaw operates as a personal-by-default assistant, then select `Yes` to proceed.
* Choose `QuickStart` as the onboarding mode.
* Select `Use existing values` to retain the previously configured workspace, model, and gateway settings. This ensures that your previously configured SiliconFlow model remains active without requiring reconfiguration.
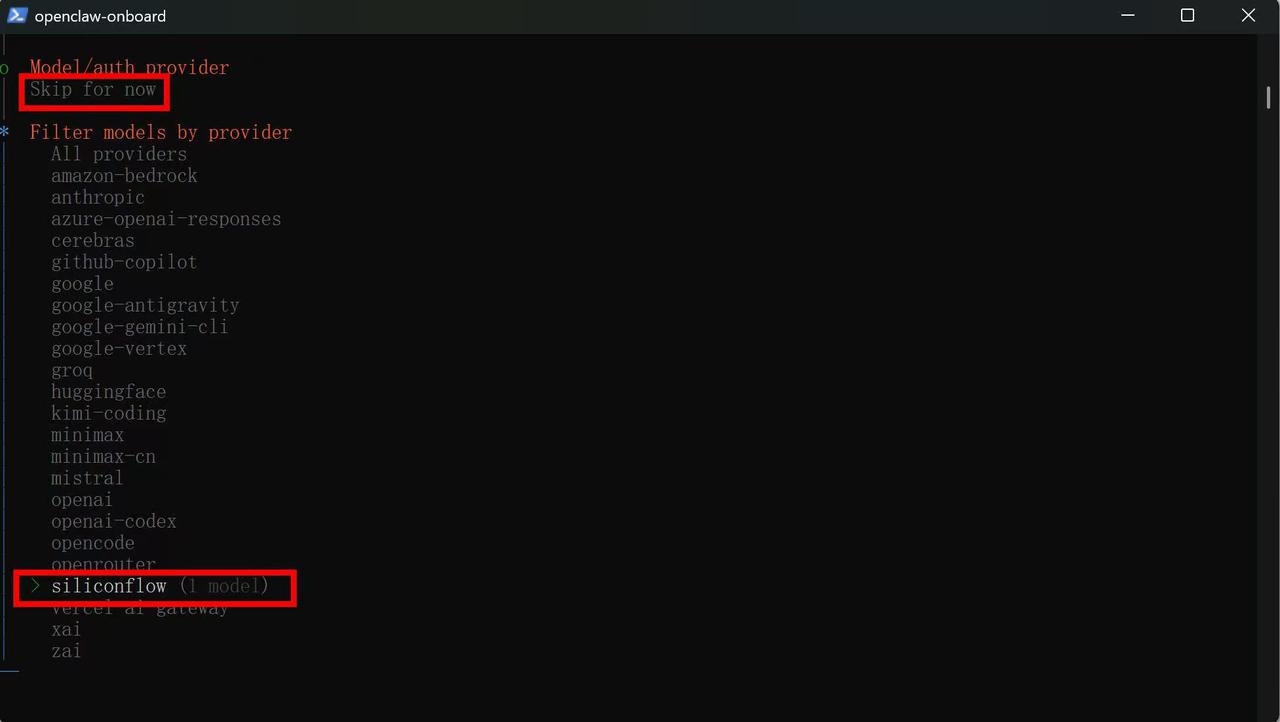
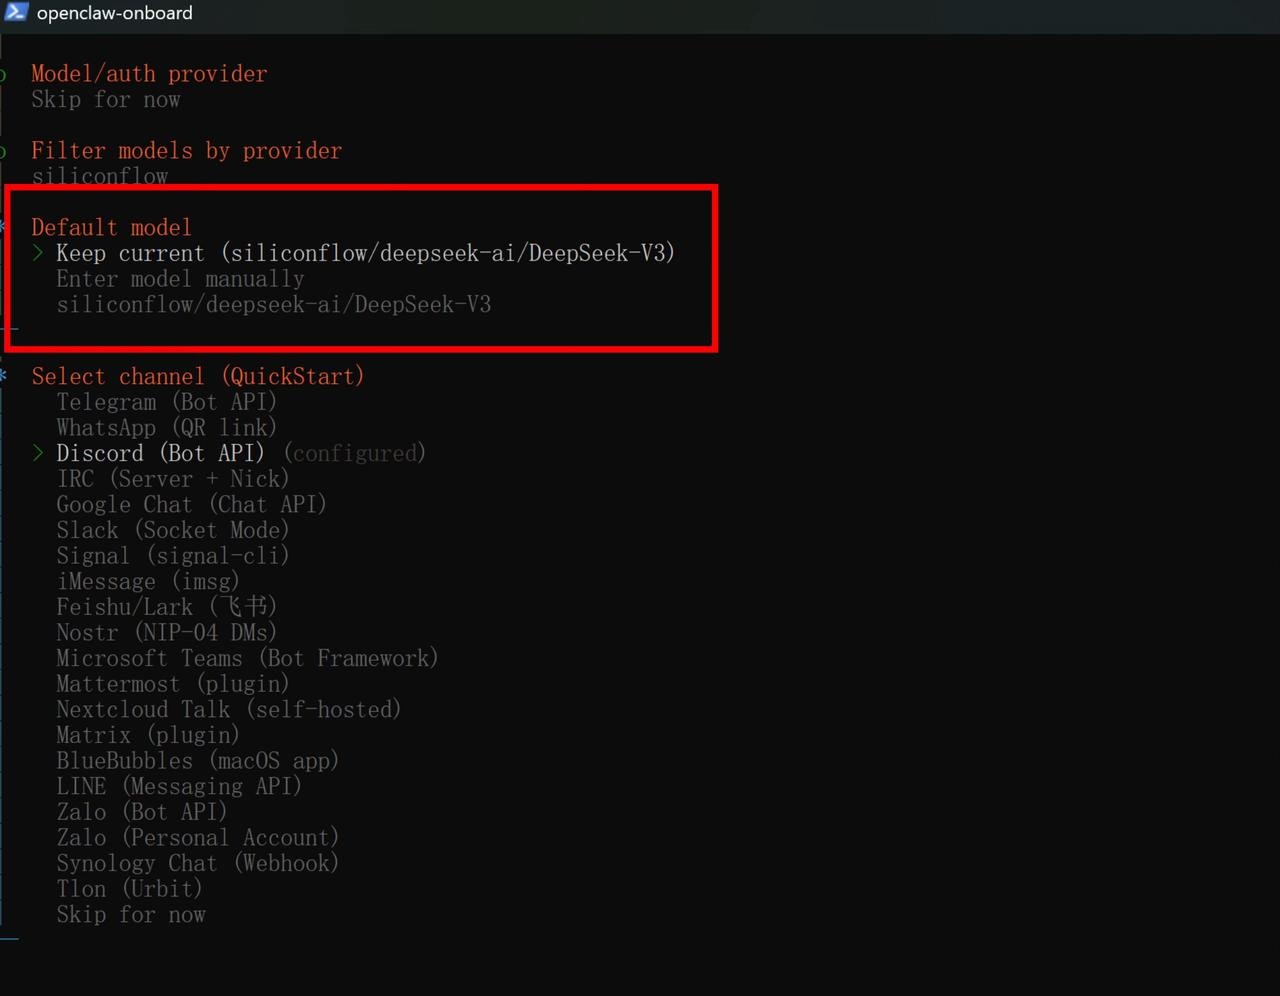
 * Select `Skip for now` in the **Model/auth provider** step.
* Select `siliconflow`in the **Filter models by provider** step.
This instructs OpenClaw to use the SiliconFlow provider block defined in `openclaw.json`.
If SiliconFlow has already been configured correctly, it will appear in the provider list automatically.
* Select `Skip for now` in the **Model/auth provider** step.
* Select `siliconflow`in the **Filter models by provider** step.
This instructs OpenClaw to use the SiliconFlow provider block defined in `openclaw.json`.
If SiliconFlow has already been configured correctly, it will appear in the provider list automatically.
 * Under **Default model**, choose `Keep current (siliconflow/deepseek-ai/DeepSeek-V3)` which confirms that OpenClaw will use the previously configured SiliconFlow model.
* Under **Select channel (QuickStart)**, choose `Discord (Bot API)`.
This step links the selected SiliconFlow model to the Discord channel, enabling AI-powered conversations within your Discord server.
* Under **Default model**, choose `Keep current (siliconflow/deepseek-ai/DeepSeek-V3)` which confirms that OpenClaw will use the previously configured SiliconFlow model.
* Under **Select channel (QuickStart)**, choose `Discord (Bot API)`.
This step links the selected SiliconFlow model to the Discord channel, enabling AI-powered conversations within your Discord server.
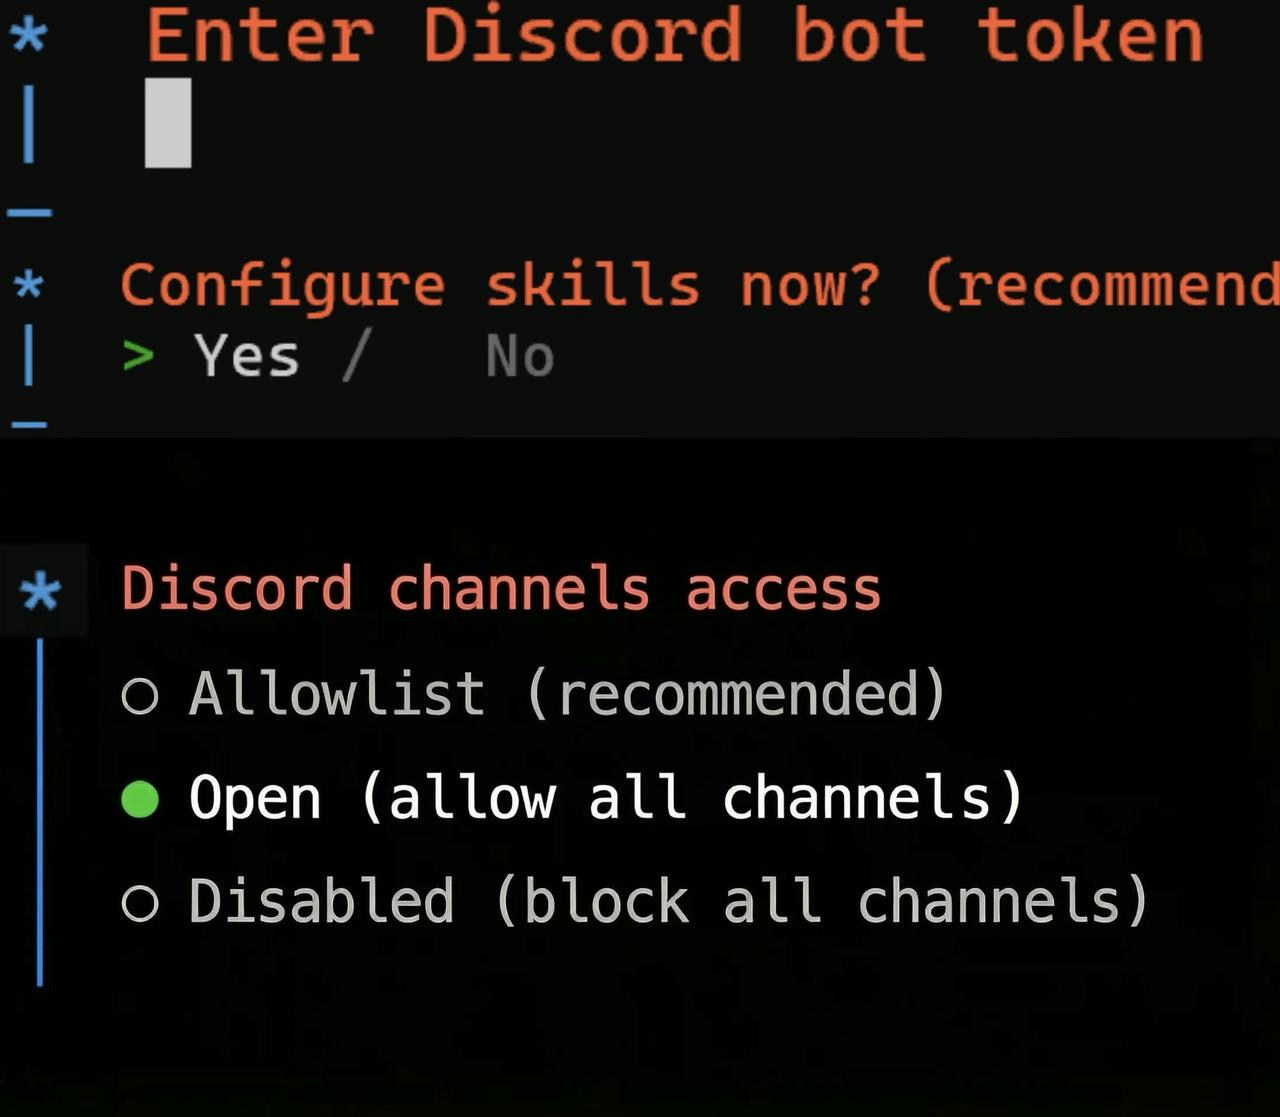
 * Paste your previously prepared Discord bot token into the input field.
* In the Configure Skills step, select `Yes` to manually configure skills, or select `No` to skip — the system will automatically enable a default set of skills on startup.
* Choose how the bot should interact with your Discord channels.
* Paste your previously prepared Discord bot token into the input field.
* In the Configure Skills step, select `Yes` to manually configure skills, or select `No` to skip — the system will automatically enable a default set of skills on startup.
* Choose how the bot should interact with your Discord channels.
 * Pairing Your Discord Bot with OpenClaw
* Open the Discord server that your bot has been invited to.
* Locate the bot you created in the member list and send it a **direct message**.
* The bot will automatically respond with a **pairing code**.
* Approve the Pairing via CLI
On the server where OpenClaw is running, execute the following command in your terminal, replacing XXXXXX with the pairing code returned by your bot:
```
openclaw pairing approve discord XXXXXX
```
Once the command is executed successfully, the Discord bot will be authenticated and linked to your OpenClaw instance.
* Pairing Your Discord Bot with OpenClaw
* Open the Discord server that your bot has been invited to.
* Locate the bot you created in the member list and send it a **direct message**.
* The bot will automatically respond with a **pairing code**.
* Approve the Pairing via CLI
On the server where OpenClaw is running, execute the following command in your terminal, replacing XXXXXX with the pairing code returned by your bot:
```
openclaw pairing approve discord XXXXXX
```
Once the command is executed successfully, the Discord bot will be authenticated and linked to your OpenClaw instance.
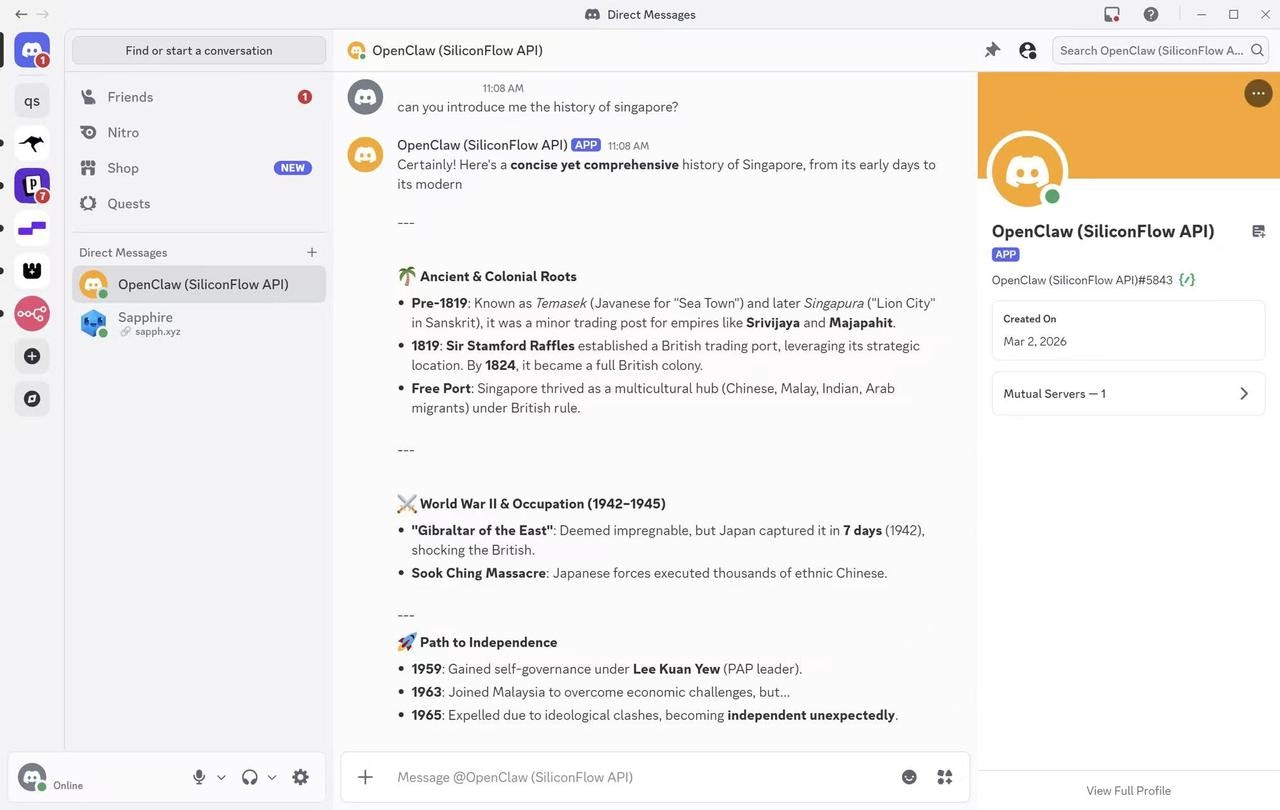 Whether you're building a productivity assistant for daily task management, a knowledge bot for your team's Discord server, or a personal AI companion available across messaging platforms, OpenClaw powered by SiliconFlow APIs gives you the flexibility to deploy cutting-edge models on your own terms.