> ## Documentation Index
> Fetch the complete documentation index at: https://docs.siliconflow.com/llms.txt
> Use this file to discover all available pages before exploring further.
# How to use CodeWhale with SiliconFlow: DeepSeek V4 Terminal Coding Agent Setup
[CodeWhale](https://codewhale.net/en) (formerly DeepSeek TUI) is a terminal coding agent built for DeepSeek V4. It runs from the `codewhale` command, streams reasoning blocks, edits local workspaces with approval gates, and includes an auto mode that chooses both model and thinking level per turn.
What sets CodeWhale apart is its [harness ](https://github.com/Hmbown/CodeWhale#how-the-harness-works)— a system of rules, evidence, and feedback that keeps the model oriented instead of drifting. At its core is a written Constitution with nine tiers of authority: user intent outranks stale instructions, verification outranks confidence, etc. The system also benefits from recursive improvement — V4 helped write the harness, and as the harness improves, V4 becomes more effective. Each turn starts stronger.
Now, [SiliconFlow](https://www.siliconflow.com/) is a built-in provider in CodeWhale. With a single command, you can connect to SiliconFlow's API and run [DeepSeek-V4-Pro](https://www.siliconflow.com/models/deepseek-v4-pro) and [DeepSeek-V4-Flash](https://www.siliconflow.com/models/deepseek-v4-flash) — no custom base URLs or manual config required. This guide walks you through installing CodeWhale and using SiliconFlow APIs in it.
# **Step 1: Prerequisites**
## **Get Your SiliconFlow API Key**
Before you begin, ensure you have a valid SiliconFlow account:
* Register a SiliconFlow account at [https://cloud.siliconflow.com/](https://cloud.siliconflow.com/). You can sign up with Google or GitHub.
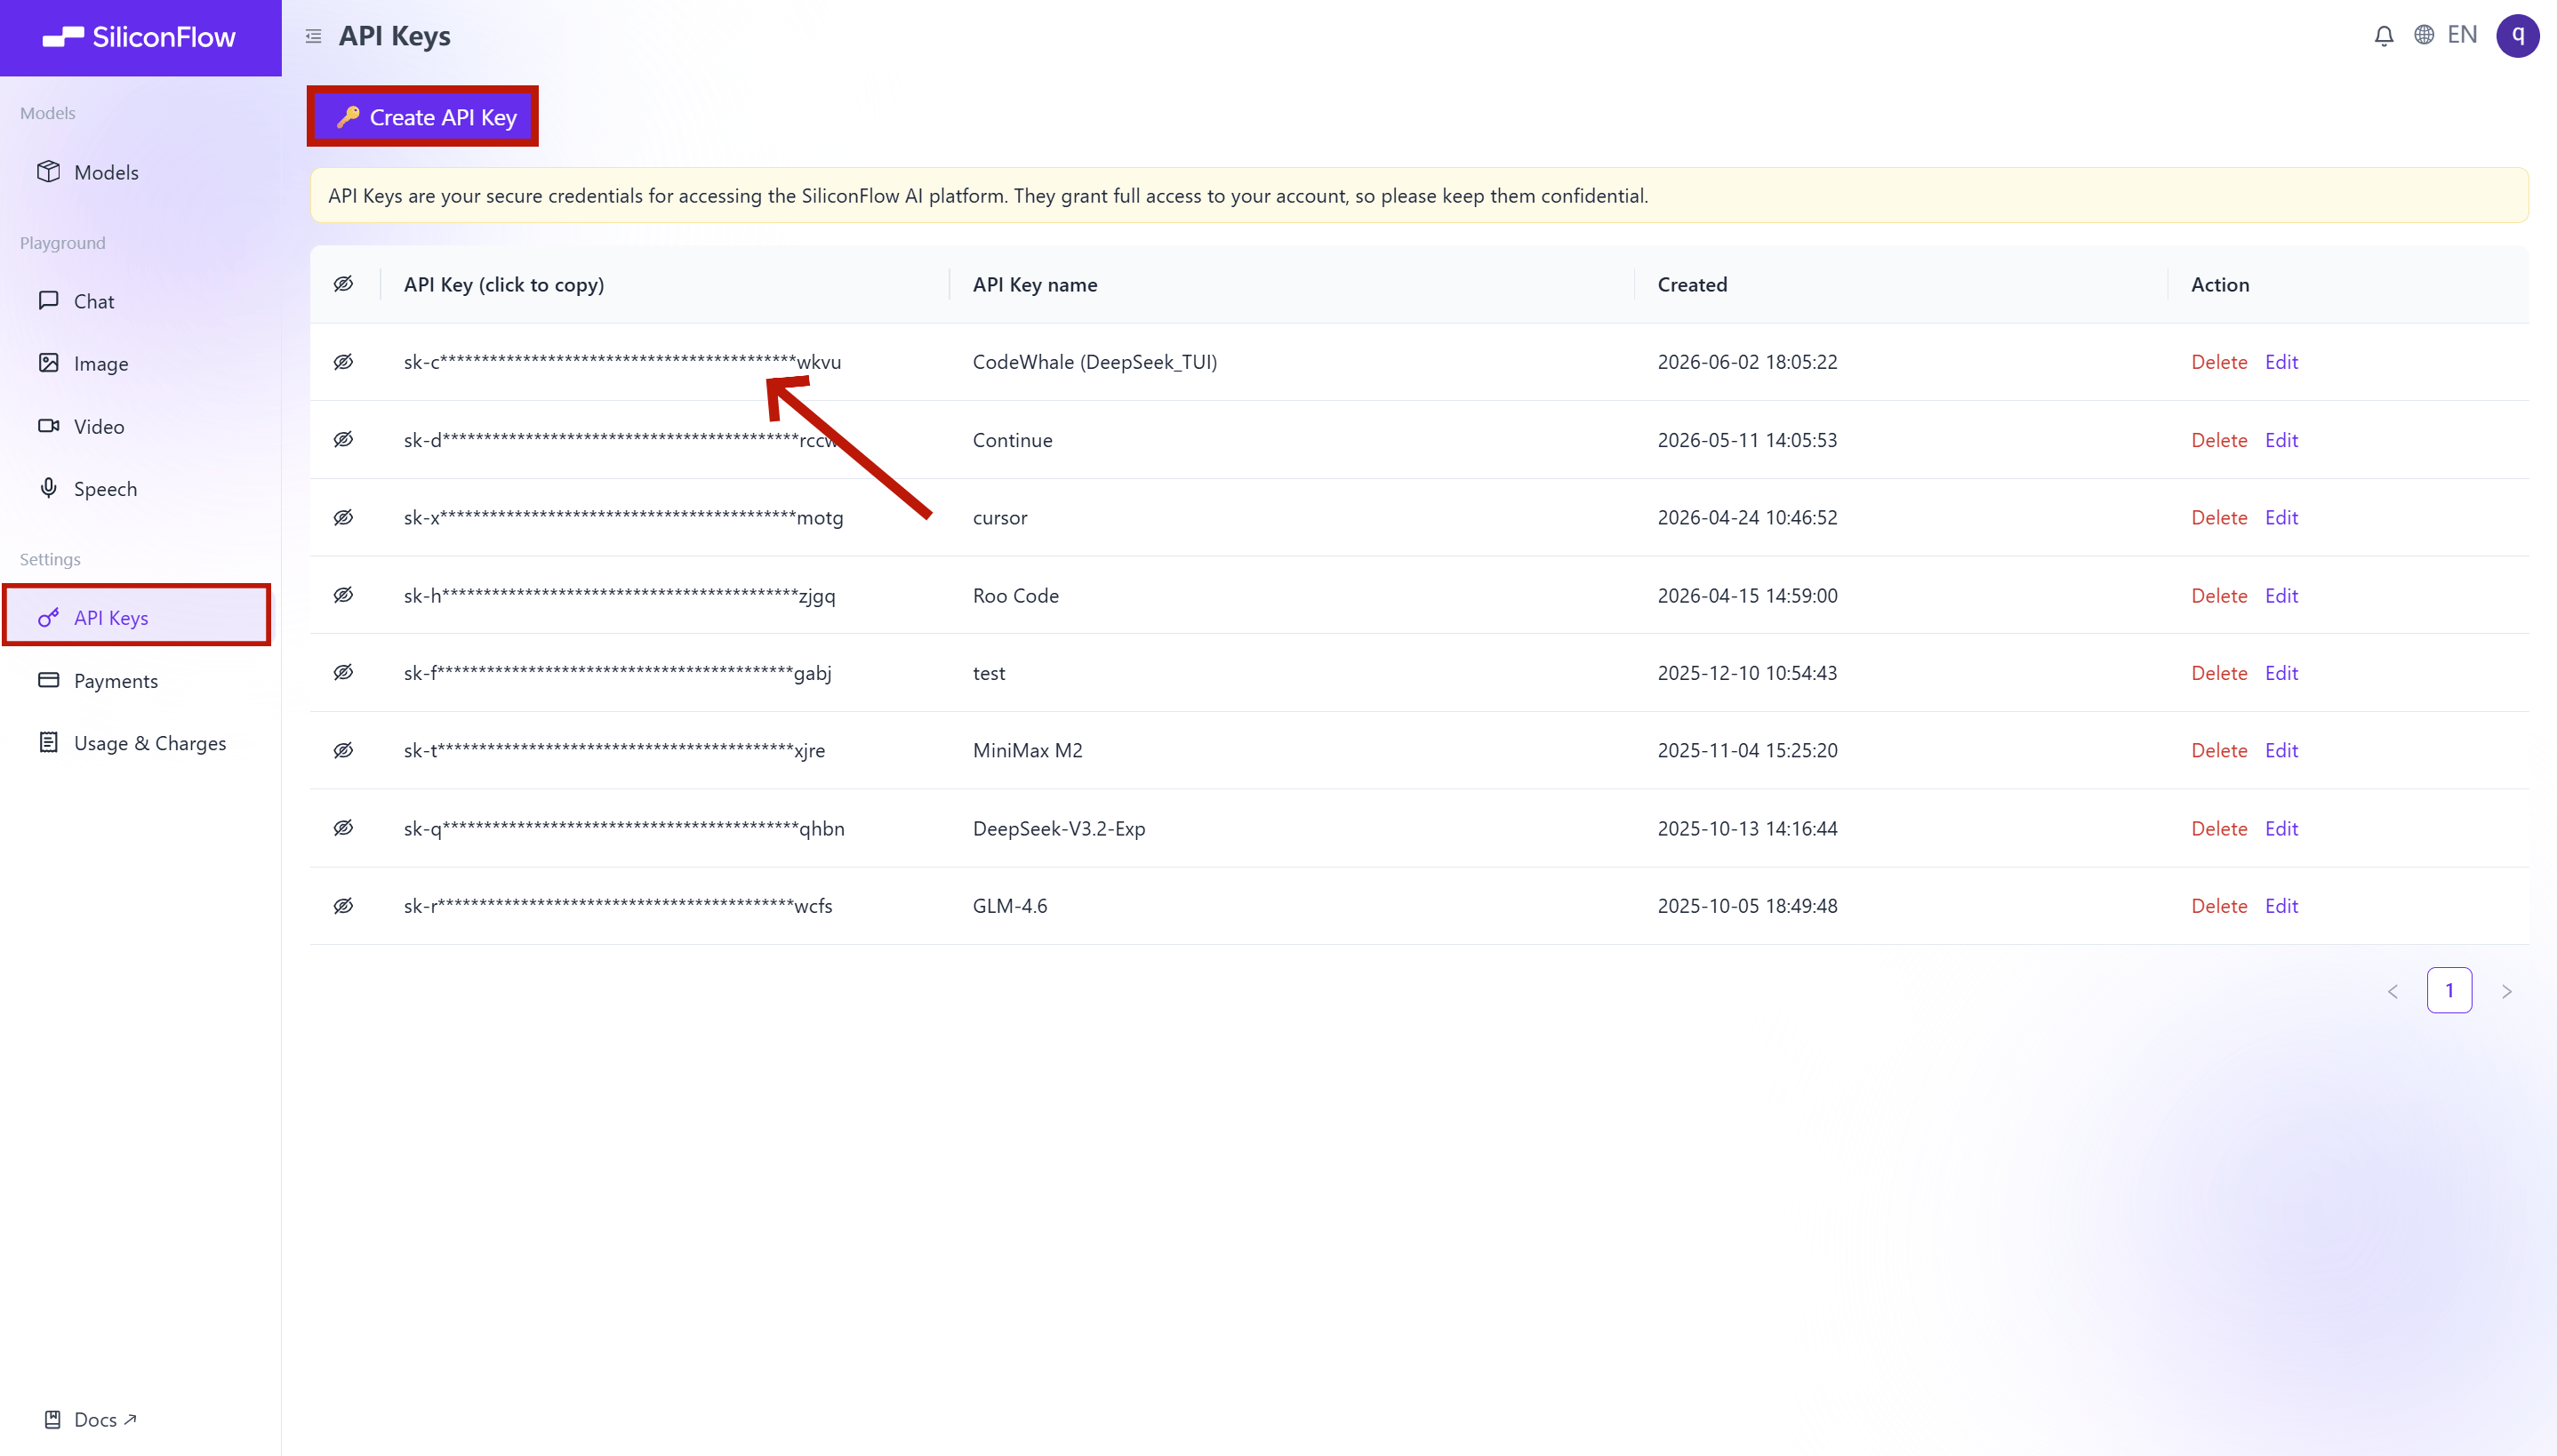
* Log in and navigate to `API Keys` in the dashboard.
* Click `🔑Create API Key `and add a name to your key to help you identify it later, then confirm to create it.
* Click the API key to copy it automatically.
⚠️ **Note:** Keep your API key secure; you will need it in the later configuration.
 # Step 2: Install & Configure
1. Install
Running the following CLI to download the prebuilt binaries for your platform from GitHub Releases and install both `codewhale` and `codewhale-tui`. This method requires Node 18+.
```JSON theme={null}
npm install -g codewhale
```
If you don't have Node installed, see [Other ways to install](https://codewhale.net/en/install) for Cargo, Homebrew, prebuilt binaries, or mainland-China mirrors.
2. Verify
```JSON theme={null}
codewhale --version
codewhale doctor
```
`codewhale doctor` checks your API key, network, sandbox availability, and MCP servers. Full report is written to `~/.codewhale/doctor.log`.
3. Update
```JSON theme={null}
codewhale update
```
Checks GitHub Releases for a newer version and replaces the binary in place. If you installed via Homebrew or npm, prefer the package manager instead: `brew upgrade deepseek-tui` or `npm update -g codewhale`. Cargo users can re-run `cargo install codewhale-cli --locked --force`.
4. Configure siliconflow
```JSON theme={null}
# SiliconFlow
codewhale auth set --provider siliconflow --api-key "YOUR_SILICONFLOW_API_KEY"
codewhale --provider siliconflow --model deepseek-ai/DeepSeek-V4-Pro
```
# Step 3: Run CodeWhale
Run CodeWhale in your terminal
```Bash theme={null}
#Launch CodeWhale from any directory:
codewhale
#Or run it inside a specific project:
cd path/to/project
codewhale
```
On first launch, CodeWhale walks you through a few setup steps:
* Press `Enter` to continue past the welcome screen
* Choose your preferred language
* Press `1` to trust and continue
* Press `Enter` to open the workspace
# Step 2: Install & Configure
1. Install
Running the following CLI to download the prebuilt binaries for your platform from GitHub Releases and install both `codewhale` and `codewhale-tui`. This method requires Node 18+.
```JSON theme={null}
npm install -g codewhale
```
If you don't have Node installed, see [Other ways to install](https://codewhale.net/en/install) for Cargo, Homebrew, prebuilt binaries, or mainland-China mirrors.
2. Verify
```JSON theme={null}
codewhale --version
codewhale doctor
```
`codewhale doctor` checks your API key, network, sandbox availability, and MCP servers. Full report is written to `~/.codewhale/doctor.log`.
3. Update
```JSON theme={null}
codewhale update
```
Checks GitHub Releases for a newer version and replaces the binary in place. If you installed via Homebrew or npm, prefer the package manager instead: `brew upgrade deepseek-tui` or `npm update -g codewhale`. Cargo users can re-run `cargo install codewhale-cli --locked --force`.
4. Configure siliconflow
```JSON theme={null}
# SiliconFlow
codewhale auth set --provider siliconflow --api-key "YOUR_SILICONFLOW_API_KEY"
codewhale --provider siliconflow --model deepseek-ai/DeepSeek-V4-Pro
```
# Step 3: Run CodeWhale
Run CodeWhale in your terminal
```Bash theme={null}
#Launch CodeWhale from any directory:
codewhale
#Or run it inside a specific project:
cd path/to/project
codewhale
```
On first launch, CodeWhale walks you through a few setup steps:
* Press `Enter` to continue past the welcome screen
* Choose your preferred language
* Press `1` to trust and continue
* Press `Enter` to open the workspace
 ## Mode
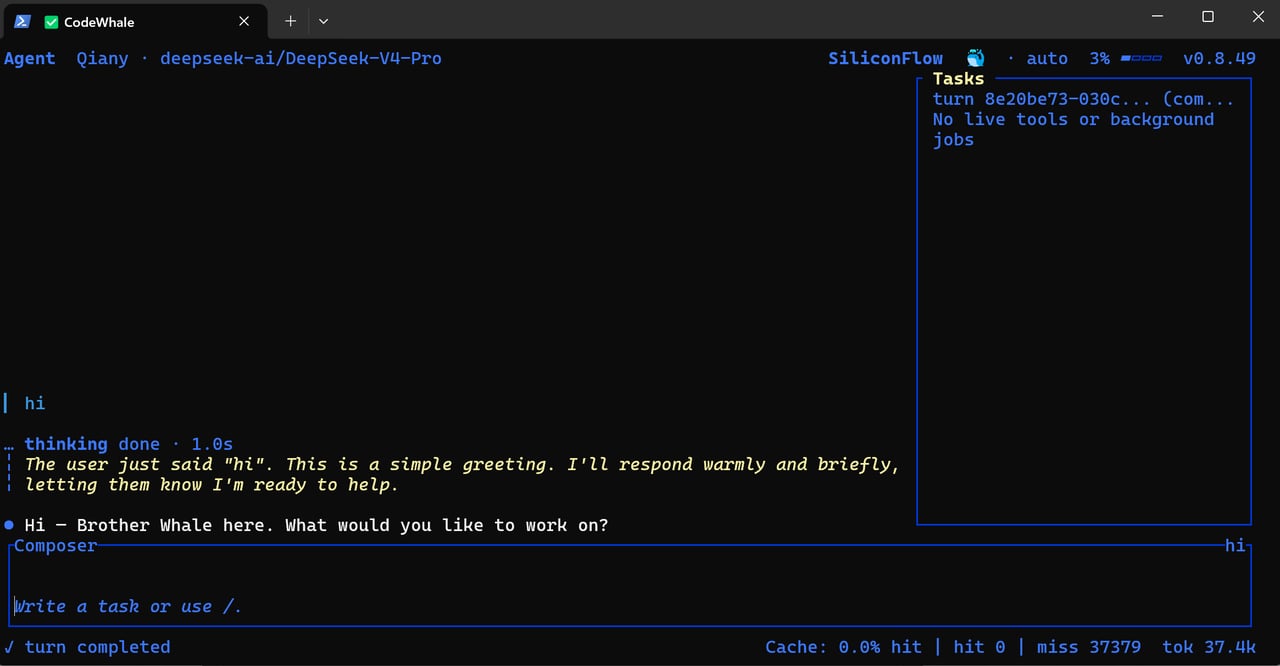
You're now in CodeWhale — the active mode (Agent), current model (deepseek-ai/DeepSeek-V4-Pro), and provider (SiliconFlow) are shown in the top bar.
Plan mode (read-only) is the default. Press `Tab` to switch to Agent mode, or press again for YOLO.
| **Mode** | **Description** |
| :------: | :--------------------------------------------------------------------------------------------------------: |
| Plan | Read-only investigation. The agent can grep, read files, list dirs, fetch URLs — never write or shell out. |
| Agent | Default. Multi-step tool use. Shell and side-effectful tools require approval per approval\_mode. |
| YOLO | Auto-approve everything + enable trust mode. Workspace boundary lifts. Use carefully. |
## Quick Reference
Also, there's a shortcut table for users to have a quick reference
| **Shortcut** | **Action** |
| :----------: | :---------------------------------: |
| Tab | Cycle mode (Plan / Agent / YOLO) |
| Shift+Tab | Cycle reasoning effort |
| Ctrl+L | Clear screen, keep session |
| Ctrl+C | Cancel current turn |
| Ctrl+D | Exit |
| /help | Slash command palette |
| /config | Edit config interactively |
| /trust | Lift workspace boundary for session |
For more detailed information on modes, tools, approval & sandbox, MCP integration, and skills, visit the [CodeWhale official documentation](https://codewhale.net/en/docs).
# DeepSeek V4 on SiliconFlow
CodeWhale is built for DeepSeek V4 series. SiliconFlow offers two variants — pick the one that fits your task, or let Auto Mode decide for you.
| | [**DeepSeek-V4-Pro**](https://www.siliconflow.com/models/deepseek-v4-pro) | [**DeepSeek-V4-Flash**](https://www.siliconflow.com/models/deepseek-v4-flash) |
| :--------------: | :-----------------------------------------------------------------------: | :---------------------------------------------------------------------------: |
| **Best for** | Complex reasoning, architecture, security review | Fast tasks, code completion, daily workflows |
| **Context** | 1M tokens | 1M tokens |
| **Cached Input** | \$0.145 / 1M | \$0.028 / 1M |
| **Input** | \$1.60 / 1M | \$0.13 / 1M |
| **Output** | \$3.48 / 1M | \$0.28 / 1M |
Prices shown are for reference only. For real-time pricing, check the [SiliconFlow Models page](https://cloud.siliconflow.com/me/models).
## **Launch with a specific model**
```Plain theme={null}
# Pro — complex reasoning
codewhale --provider siliconflow --model deepseek-ai/DeepSeek-V4-Pro
# Flash — fast and cost-efficient
codewhale --provider siliconflow --model deepseek-ai/DeepSeek-V4-Flash
```
## **Auto Mode**
Auto Mode runs a small Flash routing call before each turn to assess task complexity, then picks the right model and thinking level automatically, so you don't have to choose between speed, cost, and quality each time you use codewhale.
### How to enable
* **CLI**: `codewhale --model auto`
* **In-session**: `/model auto`
### How model routing works
Before your request is sent, codewhale runs a small routing call to assess task complexity, then selects:
* **Model**: `deepseek-v4-flash` (fast, cheap) or `deepseek-v4-pro` (powerful, slower)
* **Thinking level**: `off` / `high` / `max`
| **Task type** | **Model** | **Thinking** |
| :-----------------------------: | :-------: | :----------: |
| Simple Q\&A, short replies | V4 Flash | off |
| Coding, debugging, release work | V4 Pro | high or max |
| Architecture, security review | V4 Pro | max |
# **Already Using OpenRouter?**
## Bring Your Own Key
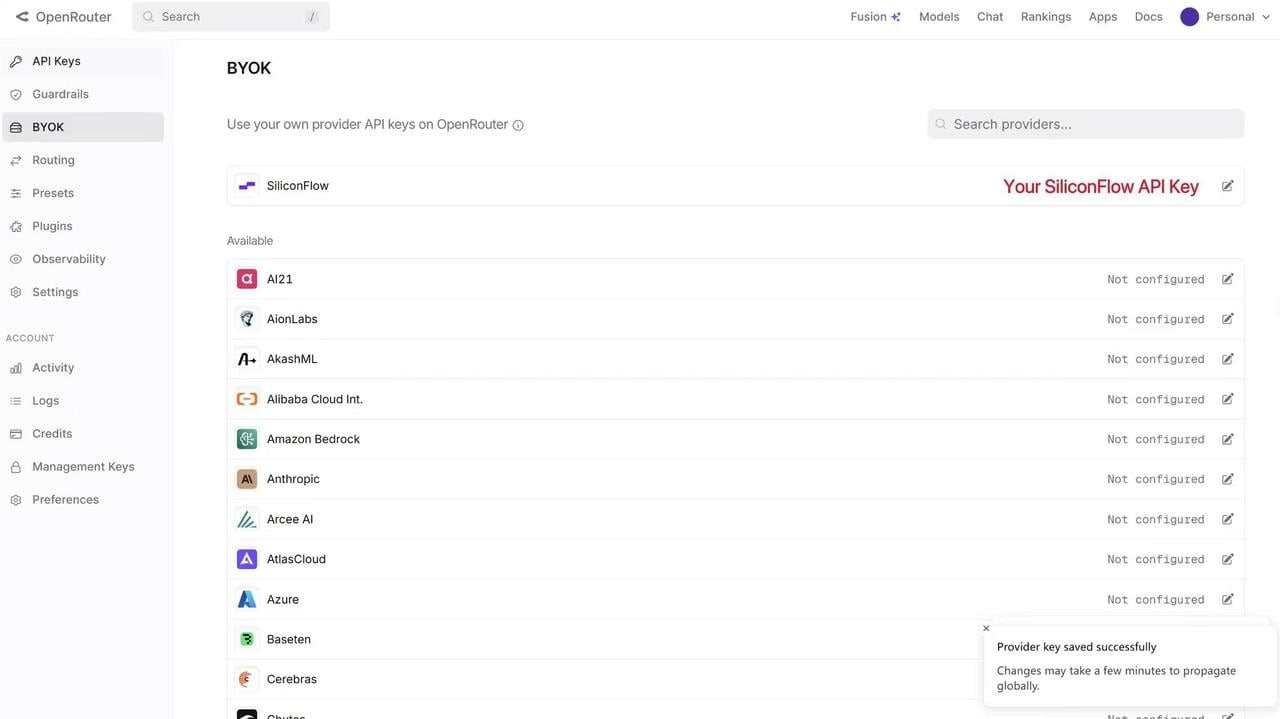
If you already have an OpenRouter account, you can connect your SiliconFlow API key via BYOK.
Once connected:
* Requests draw from your SiliconFlow balance first
* Billing and rate limits stay in your SiliconFlow account
* OpenRouter's fallback routing still works to improve reliability
**Bonus:** OpenRouter waives platform fees on your first 1M BYOK requests per month.
## Mode
You're now in CodeWhale — the active mode (Agent), current model (deepseek-ai/DeepSeek-V4-Pro), and provider (SiliconFlow) are shown in the top bar.
Plan mode (read-only) is the default. Press `Tab` to switch to Agent mode, or press again for YOLO.
| **Mode** | **Description** |
| :------: | :--------------------------------------------------------------------------------------------------------: |
| Plan | Read-only investigation. The agent can grep, read files, list dirs, fetch URLs — never write or shell out. |
| Agent | Default. Multi-step tool use. Shell and side-effectful tools require approval per approval\_mode. |
| YOLO | Auto-approve everything + enable trust mode. Workspace boundary lifts. Use carefully. |
## Quick Reference
Also, there's a shortcut table for users to have a quick reference
| **Shortcut** | **Action** |
| :----------: | :---------------------------------: |
| Tab | Cycle mode (Plan / Agent / YOLO) |
| Shift+Tab | Cycle reasoning effort |
| Ctrl+L | Clear screen, keep session |
| Ctrl+C | Cancel current turn |
| Ctrl+D | Exit |
| /help | Slash command palette |
| /config | Edit config interactively |
| /trust | Lift workspace boundary for session |
For more detailed information on modes, tools, approval & sandbox, MCP integration, and skills, visit the [CodeWhale official documentation](https://codewhale.net/en/docs).
# DeepSeek V4 on SiliconFlow
CodeWhale is built for DeepSeek V4 series. SiliconFlow offers two variants — pick the one that fits your task, or let Auto Mode decide for you.
| | [**DeepSeek-V4-Pro**](https://www.siliconflow.com/models/deepseek-v4-pro) | [**DeepSeek-V4-Flash**](https://www.siliconflow.com/models/deepseek-v4-flash) |
| :--------------: | :-----------------------------------------------------------------------: | :---------------------------------------------------------------------------: |
| **Best for** | Complex reasoning, architecture, security review | Fast tasks, code completion, daily workflows |
| **Context** | 1M tokens | 1M tokens |
| **Cached Input** | \$0.145 / 1M | \$0.028 / 1M |
| **Input** | \$1.60 / 1M | \$0.13 / 1M |
| **Output** | \$3.48 / 1M | \$0.28 / 1M |
Prices shown are for reference only. For real-time pricing, check the [SiliconFlow Models page](https://cloud.siliconflow.com/me/models).
## **Launch with a specific model**
```Plain theme={null}
# Pro — complex reasoning
codewhale --provider siliconflow --model deepseek-ai/DeepSeek-V4-Pro
# Flash — fast and cost-efficient
codewhale --provider siliconflow --model deepseek-ai/DeepSeek-V4-Flash
```
## **Auto Mode**
Auto Mode runs a small Flash routing call before each turn to assess task complexity, then picks the right model and thinking level automatically, so you don't have to choose between speed, cost, and quality each time you use codewhale.
### How to enable
* **CLI**: `codewhale --model auto`
* **In-session**: `/model auto`
### How model routing works
Before your request is sent, codewhale runs a small routing call to assess task complexity, then selects:
* **Model**: `deepseek-v4-flash` (fast, cheap) or `deepseek-v4-pro` (powerful, slower)
* **Thinking level**: `off` / `high` / `max`
| **Task type** | **Model** | **Thinking** |
| :-----------------------------: | :-------: | :----------: |
| Simple Q\&A, short replies | V4 Flash | off |
| Coding, debugging, release work | V4 Pro | high or max |
| Architecture, security review | V4 Pro | max |
# **Already Using OpenRouter?**
## Bring Your Own Key
If you already have an OpenRouter account, you can connect your SiliconFlow API key via BYOK.
Once connected:
* Requests draw from your SiliconFlow balance first
* Billing and rate limits stay in your SiliconFlow account
* OpenRouter's fallback routing still works to improve reliability
**Bonus:** OpenRouter waives platform fees on your first 1M BYOK requests per month.
 # Resources
## **CodeWhale (DeepSeek-TUI)**
* GitHub: [https://github.com/Hmbown/CodeWhale](https://github.com/Hmbown/CodeWhale)
* Docs: [https://codewhale.net/en/docs](https://codewhale.net/en/docs)
## **OpenRouter**
* BYOK Setting: [openrouter.ai/workspaces/default/byok](https://openrouter.ai/workspaces/default/byok)
* SiliconFlow on OpenRouter: [openrouter.ai/provider/siliconflow](https://openrouter.ai/provider/siliconflow)
## **SiliconFlow**
* Website: [siliconflow.com](http://siliconflow.com)
* API Docs: [docs.siliconflow.com](http://docs.siliconflow.com)
* Model Library: [siliconflow.com/models](https://siliconflow.com/models)
* Discord: [Join our community](https://discord.com/invite/7Ey3dVNFpT)
* X: [@SiliconFlowAI](https://x.com/SiliconFlowAI)
# Resources
## **CodeWhale (DeepSeek-TUI)**
* GitHub: [https://github.com/Hmbown/CodeWhale](https://github.com/Hmbown/CodeWhale)
* Docs: [https://codewhale.net/en/docs](https://codewhale.net/en/docs)
## **OpenRouter**
* BYOK Setting: [openrouter.ai/workspaces/default/byok](https://openrouter.ai/workspaces/default/byok)
* SiliconFlow on OpenRouter: [openrouter.ai/provider/siliconflow](https://openrouter.ai/provider/siliconflow)
## **SiliconFlow**
* Website: [siliconflow.com](http://siliconflow.com)
* API Docs: [docs.siliconflow.com](http://docs.siliconflow.com)
* Model Library: [siliconflow.com/models](https://siliconflow.com/models)
* Discord: [Join our community](https://discord.com/invite/7Ey3dVNFpT)
* X: [@SiliconFlowAI](https://x.com/SiliconFlowAI)